Some days I am awesome: the story of how I reupholstered a couch

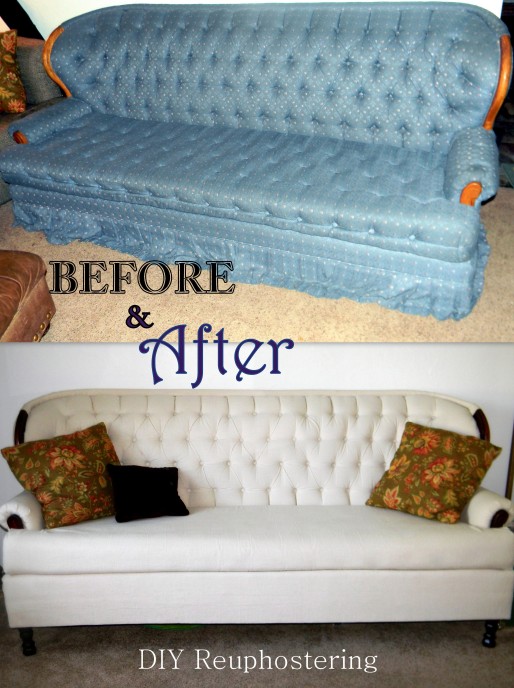
I love DIY, a lot. But I think all DIYer’s will admit that there is that one project that they would love to do but they are way to scared to try. Mine was reupholstering. I really wanted to try it, and I REALLY wanted a new couch, but I was so scared of what might happen, of all of the things that could go terribly wrong. Also, there really aren’t that many Pins about it on Pinterest, I looked all over the place and found only a few who had done the whole thing from start to finish; not an encouraging sign.

And then it happened. I was at my local “previously loved” store ( ie. thrift store) and I saw this couch. DSCN7215Now I know what you are thinking, ” Alix, that is a 1980’s nightmare”. And you are absolutely right… mostly. The color, the fabric, the oak details, yuck. But despite all that I really wanted to get it, I just knew I could do great things with that couch. I waited till the hubby got off work and we went and looked at it together. He said since it was only 25 bucks there was really no harm in trying, the worst that could happen was that it ends up at the dump, which is where is would have ended up anyway. I love that man.

Having basically no idea where to start, I just started taking off all of that horrid fabric. This proved to be the hardest part.  It took a FULL day to tear it down to frame, and I mean working from 7am to 11pm with almost no stopping. I had blisters, I was sweaty and my poor husband had to make his own dinner.

Apparently when they make couches they are required to use 6 billion staples to ensure it is secure. That picture of the staples is one of the 5 bowls of staple I pulled out of it. It was a little crazy.  Now if you are attempting to reupholster a couch (or anything for that matter) know this: that was the most labor intensive part, for me at least. It sucked, but it was worth it in the end. Also, do NOT throw away the old fabric, I know it is temping but don’t do it yet.

While I was taking it apart I took notes and few pictures of how things went together. This proved to be REALLY helpful later on; knowing how things came apart really helps when it comes time to put it back together.

So on to the next step, covering up the naked couch.

Because I had know idea if this was going to turn out well or not I did not want to spend a fortune on fabric. I decided to go with regular old painter’s drop cloth. Its durable, I like the look, it comes in large enough sections to cover a couch, and it is dirt cheap. Seriously. 24 dollars to cover the whole couch ( and its a pretty big couch).  DSCN7218

Earlier I said if you are reupholstering something, don’t throw away the old fabric right away, here is why. I used the fabric pieces as templates for the new fabric. This save so much time and made things so simple. My biggest tip is when you lay the old fabric out, try to get all the wrinkles and creases out. This will help you make sure the new fabric pieces are the right size. DSCN7220After all the fabric was cut out, it was just a matter of getting it on there. I wont go into deep detail on how I did it because I think that might get super boring and if you are attempting to do your own couch or chair its obviously going to be different than mine. But I will say that you are going to need a staple gun and some elbow grease. Take your time and follow the tip my mom gave me about fabric: Fabric has a way that it wants to lay, don’t fight it, work with it.

On the arms I took my time and made sure that they were smooth by adding a layer of batting, I also made sure that the fabric creased where it wanted to and that they matched up on both sides.

If you recall the original picture of the couch, there were a TON of buttons, on almost ever surface they could possibly put a button. There were well over a hundred. That was a bit excessive for my taste ( and most people’s I would assume), but I  did want the tufting on the back rest, I me love some nice tufting. Originally I had the idea that I would go get new buttons. Well they are kind of pricy when you are getting sixty of them. I also looked into getting a machine to make my own upholstered buttons.  turns out those can be a rather expensive as well. I was getting a little desperate and then it occurred to me, why don’t I just paint old ones?! I know that sounds a little wacky but I was able to match the color of the fabric almost perfectly and using the old ones made things a lot easier when I put it back together.

And then came the tufting. Now I wont lie, the way this couch was made and the buttons that were used made it pretty simple. The only tricky part I had to deal with was making sure the fabric layed nicely. I started by laying the old fabric on the new fabric and then marking where the center button should go. DSCN7241

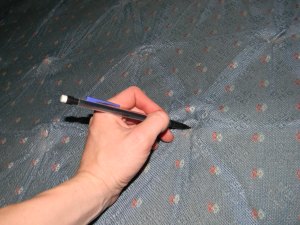
I put the first button in and then went in a spiral out from that point. This helped me to make sure that as I pulled the fabric tight I ended up with enough fabric top to bottom and on both sides.

It came out just how I wanted it to! I was so so happy with the tufting!

The couch originally had a tufted cushoin as well, I didn’t want to do that but that left me with the dilema of having a cushion with tons of little dimples in it. My father-in-law gave me this great tip that solved that problem in no time. If you take a steamer ( or in my case an iron on the steam setting) and run it over the dimples and creases they will plump back up to normal. I was a little skeptical but it worked  SO well. I felt like Harry Potter, it was seriously that magical.


Awesome right?!

We  then found some new feet for it and stained all the wood pieces a dark mahogany. DSCN7327
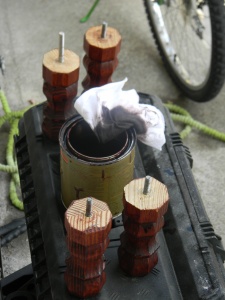
From that point all I did (with some help from the hubby) was get the last few pieces of fabric on there to finish the job.

I love it. This couch is completely my style, its comfortable and it fits a lot of people comfortably.  I was a little concerned about having a white couch with a toddler in the house, so I scotch guarded it like crazy and we have had not problems with it so far.

So the moral of the story is, whatever your big, scary DIY project is that you are to afraid to try, Give it a Shot! It may turn out better than you ever hoped it would 🙂

2013-09-04


Posted in DIY

A Sign for the Kitchen

I don’t know what I am going to do when Cam stops  taking naps. I get SO much done during those quiet hours of sleep.  Yesterday I made a sign to hang over the dining room table, in the time it took Cam to take one nice afternoon snooze.

I have been wanting to do this for a while now, but we have been refinishing dining room chairs for what seems like forever, and I told myself that I wouldn’t start anything else until the chairs were done because I didn’t want the house to be a complete disaster. So, having completed the chair project on Thursday (hallelujah!) I promptly went to work on the sign project on Friday.

DSCN6314

I wont lie, I really thought this would take longer to make than it did. We are talking like 2-2.5 hours from start to finish (or however long a 14 month old’s nap is).

I started by grabbing some scraps of wood that were laying around, I have plenty because of the pallet nightstands we made a few weeks ago.  I chose three wide pieces for the front and two small pieces to hold them together on the back.

I realize now that I should have taken pictures of what I did to hang it, but in my excitement I completely forgot. It was pretty simple, an eye screw attached on each of the small boards in back and a picture hanging wire strung between them. Easy peasy.


Next, I free handed the saying I wanted with a pencil. I am  what I like to call “artisticly challenged” so this was by far the harded part for me. I looked up some fonts that I like and then did my best to make it look pretty. And it worked! So if I can do it, anyone can!

From there it was time to start painting on the lettering, this was a little tricky because the wood was rough but I actually had a lot of fun doing it.

I finished the letters and that was it. No joke. This project was Super simple and its exactly what I wanted for the dining room!

Posted in DIY

Pallet Nightstand

It has been a while since I have done a big project, which is sad because I am a project addict. But I’m back in my groove and I’m loving it! So, about two weeks ago I saw an ad on craigslist for free pallets, and I got to thinking ” I bet I could make something out of pallets”.  When I brought it up with Brynt, he told me to “please, please please make new night stands for us!”. So I scoured Pinterest for ideas, there were a few pallet night stands out there but nothing that I really liked. So I decided to wing it, which is pretty much how I do everything.

Before I get started on how I did it I would just like to add this little tid bit that I feel is left out of all the other DYI pallet posts on the internet; the hardest part by far of this whole project was getting the stinking boards off the freaking pallet! Holy cow, what a pain, but totally worth it. Ok, you have been warned.

I started by making a box and then nailing boards to it vertically. Again, I really didn’t have a step by step plan, I just had an idea of what I wanted to do.

DSCN5935

This continued and my hubby helped me by putting one of the shelf supports in the bottom which gave it more stability and thus made putting the rest of the board in easier.

The next step ( I thought) was to add the rest of the shelf supports. So I did that, and guess what? It was REALLY hard to get the top measure the same width as the bottom. Granted, had there been an extra person or two to push the top to the right width while I nailed the boards on, I think I could have managed it. But alas, I work alone.  So then my husband came to my rescue once again. “If we take the shelf supports out and nail the top on at the correct width, it should make things a lot easier”. He is so smart.

DSCN5941

Next I added the remainder of the small boards I used to keep the shelves in place to the front to make it look a little more finished.

DSCN5946

Finally I had reached my favorite part of almost any project: sanding and painting. I chose to not sand it to much because I wanted more of a rustic look,  I also knew I wanted to do a white wash on it so I left it a little on the rough side so it would soak up more of the wash.

This was my first time white washing something and I learned a few things. At first when I put it on I thought ” oh no, its way to white!”, but I quickly learned that it soaks in really fast and I actually ended up doing about 3 coats of white wash to achieve the look I was going for.  Ta Da!

DSCN5951

To finish it off, I recovered the old black storage bins from our old night stands with some fabric I found at the thrift store, and added a lace detail for something pretty 🙂

DSCN5952

I absolutely love how it turned out. And I can’t wait to get started making its twin!

Posted in DIY

New life to an Old Dresser

I love re-purposing things. Not just a little bit, I really love it. There is something incredibly satisfying about taking something old and forgotten and giving it a new home.

Well this weekend I did my my finest re-purposing work yet.

I should start by saying that recently we got a new flat panel TV, it is replasing the tv that Brynt’s parents gave us when we first got married, which was a GREAT tv (seriously, so thankful for awesome inlaws who happy gave us their old tv), but it was a bit bulky. Or a lot bulky. So we got a new tv on black friday ( smokin’ good deal), and is SO much less bulky! I know that Brynt is loving it because it is big and cool, and I do too, but mostly I like it because it is flat.

Anyways, because we got this new tv, I really wanted a new tv stand as well. The bulky tv had been sitting on an old coffee table who, like the tv which it served, was quite bulky. Not Cool. So I scoured the online for sale ads until I came across the perfect dresser to convert to an entertainment center. She didn’t look like much to start with, but I had a vision and I knew I could turn that dresser into something great. And I did.

I am in love with how it turned out, it is seriously exactly what I wanted. I totally did a little happy dance when I took a look at my final outcome 🙂

This is it before, your average, run of the mill dresser.

This is it before, your average, run of the mill dresser.

And here is the transformation…


The Finished product.

DSCN5226

DSCN5208DSCN5231


Posted in DIY

Sewing time!

So I have been on a sewing streak lately, and yesterday I made this little number for Camberlyn.

Talk about easy and fun! I took a toddler t-shirt some one had given us, took the sleeves off, took it on on the sides, finished off the edges of the new sleeves and added a flower detail from the scraps and ta da! Now she has a cute little summer dress to enjoy   🙂
Posted in DIY

Back Porch Garden Box

So Brynt and I love projects. making stuff, remaking stuff, its our thing.
Today we built a garden box for the back step, and its awesome. We live in a townhouse/apartment so we don’t really have a yard that is “ours”, its more like everyone’s yard. But I really wanted to do a little garden this summer. Solution? This little guy.

This was honestly really easy. The side pieces are pre-made stairs that you can get at Lowes or Home Depot that we flipped over. We used 2×4’s for the middle sections, it took five 8ft boards cut in half: two in the back of the top tier, two in the front of the bottom tier, one in the back of the bottom tier (laid flat ) and one in the front of the top tier (up right). We then covered the bottom of the box with screen door fabric… And that is it. Simple.

Then it was on to the fun part of filling it with dirt and planting! Yay! Here is the finished product.

Fits great on the back step and saves lots of room. I am a happy girl.

Posted in DIY

Dresser Redo

I have been wanting to get a dresser for the baby’s room for a while now, but I just couldn’t find one that was the right dimensions for her room. Then I came across this little guy at a thrift store the other day.

It wasn’t exactly a beauty to start with but I saw potential.
So, First step : Sand it down. Just enough to get the finish off so the paint will stick.

Next : Paint! Brynt is the one who chose this wild green, but the rest her furniture is very colorful as well so it works. It took about 3 coats for it to really be covered.
For the drawers I had decided that I wanted to cover them in different colored fabrics. 
I found squares of fabric at the store meant for quilting that worked great. I made sure to Iron them first.
Then I removed the handles and applied Mod Podge to the drawer face.
 I then smoothed out the fabric onto the drawer, and covered with more Mod Podge.
To finish it off I trimmed the excess fabric, painted and re-atatched the handles and it was ready to go!
And I love it! It goes great in her colorful and crazy room 🙂

Posted in DIY