I love DIY, a lot. But I think all DIYer’s will admit that there is that one project that they would love to do but they are way to scared to try. Mine was reupholstering. I really wanted to try it, and I REALLY wanted a new couch, but I was so scared of what might happen, of all of the things that could go terribly wrong. Also, there really aren’t that many Pins about it on Pinterest, I looked all over the place and found only a few who had done the whole thing from start to finish; not an encouraging sign.
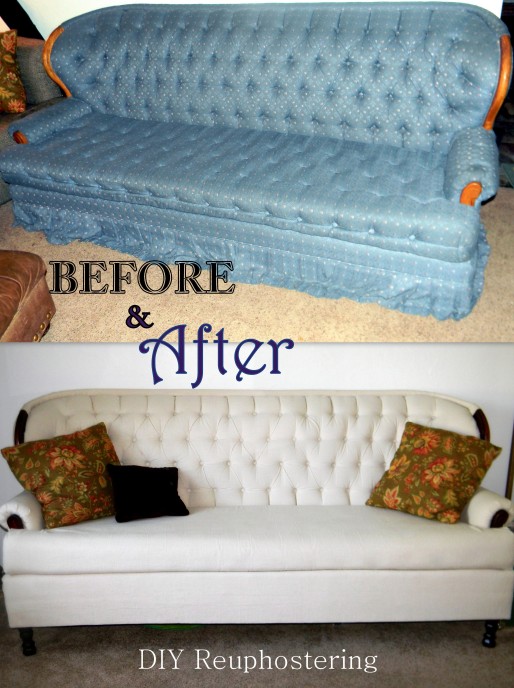
And then it happened. I was at my local “previously loved” store ( ie. thrift store) and I saw this couch.  Now I know what you are thinking, ” Alix, that is a 1980’s nightmare”. And you are absolutely right… mostly. The color, the fabric, the oak details, yuck. But despite all that I really wanted to get it, I just knew I could do great things with that couch. I waited till the hubby got off work and we went and looked at it together. He said since it was only 25 bucks there was really no harm in trying, the worst that could happen was that it ends up at the dump, which is where is would have ended up anyway. I love that man.
Having basically no idea where to start, I just started taking off all of that horrid fabric. This proved to be the hardest part. It took a FULL day to tear it down to frame, and I mean working from 7am to 11pm with almost no stopping. I had blisters, I was sweaty and my poor husband had to make his own dinner.
Apparently when they make couches they are required to use 6 billion staples to ensure it is secure. That picture of the staples is one of the 5 bowls of staple I pulled out of it. It was a little crazy. Now if you are attempting to reupholster a couch (or anything for that matter) know this: that was the most labor intensive part, for me at least. It sucked, but it was worth it in the end. Also, do NOT throw away the old fabric, I know it is temping but don’t do it yet.
While I was taking it apart I took notes and few pictures of how things went together. This proved to be REALLY helpful later on; knowing how things came apart really helps when it comes time to put it back together.
So on to the next step, covering up the naked couch.
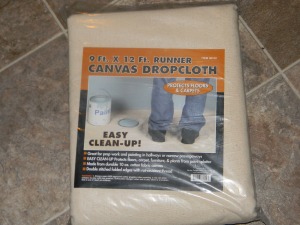
Because I had know idea if this was going to turn out well or not I did not want to spend a fortune on fabric. I decided to go with regular old painter’s drop cloth. Its durable, I like the look, it comes in large enough sections to cover a couch, and it is dirt cheap. Seriously. 24 dollars to cover the whole couch ( and its a pretty big couch). 
Earlier I said if you are reupholstering something, don’t throw away the old fabric right away, here is why. I used the fabric pieces as templates for the new fabric. This save so much time and made things so simple. My biggest tip is when you lay the old fabric out, try to get all the wrinkles and creases out. This will help you make sure the new fabric pieces are the right size.  After all the fabric was cut out, it was just a matter of getting it on there. I wont go into deep detail on how I did it because I think that might get super boring and if you are attempting to do your own couch or chair its obviously going to be different than mine. But I will say that you are going to need a staple gun and some elbow grease. Take your time and follow the tip my mom gave me about fabric: Fabric has a way that it wants to lay, don’t fight it, work with it.
On the arms I took my time and made sure that they were smooth by adding a layer of batting, I also made sure that the fabric creased where it wanted to and that they matched up on both sides.
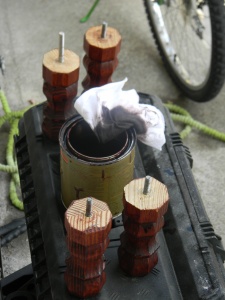
If you recall the original picture of the couch, there were a TON of buttons, on almost ever surface they could possibly put a button. There were well over a hundred. That was a bit excessive for my taste ( and most people’s I would assume), but I did want the tufting on the back rest, I me love some nice tufting. Originally I had the idea that I would go get new buttons. Well they are kind of pricy when you are getting sixty of them. I also looked into getting a machine to make my own upholstered buttons. turns out those can be a rather expensive as well. I was getting a little desperate and then it occurred to me, why don’t I just paint old ones?! I know that sounds a little wacky but I was able to match the color of the fabric almost perfectly and using the old ones made things a lot easier when I put it back together.
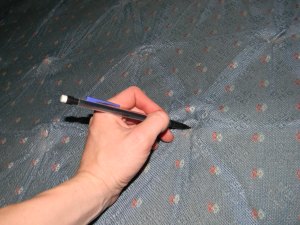
And then came the tufting. Now I wont lie, the way this couch was made and the buttons that were used made it pretty simple. The only tricky part I had to deal with was making sure the fabric layed nicely. I started by laying the old fabric on the new fabric and then marking where the center button should go. 
I put the first button in and then went in a spiral out from that point. This helped me to make sure that as I pulled the fabric tight I ended up with enough fabric top to bottom and on both sides.
It came out just how I wanted it to! I was so so happy with the tufting!
The couch originally had a tufted cushoin as well, I didn’t want to do that but that left me with the dilema of having a cushion with tons of little dimples in it. My father-in-law gave me this great tip that solved that problem in no time. If you take a steamer ( or in my case an iron on the steam setting) and run it over the dimples and creases they will plump back up to normal. I was a little skeptical but it worked SO well. I felt like Harry Potter, it was seriously that magical.
Awesome right?!
We then found some new feet for it and stained all the wood pieces a dark mahogany.  From that point all I did (with some help from the hubby) was get the last few pieces of fabric on there to finish the job.
I love it. This couch is completely my style, its comfortable and it fits a lot of people comfortably. I was a little concerned about having a white couch with a toddler in the house, so I scotch guarded it like crazy and we have had not problems with it so far.
So the moral of the story is, whatever your big, scary DIY project is that you are to afraid to try, Give it a Shot! It may turn out better than you ever hoped it would 🙂


Oh my goodness, Alix, you are simply amazing. I’m in shock at how GORGEOUS that yucky sofa turned out! I love the idea of painter’s drop cloth! I would have never thought of that, but it’s SO much less expensive than upholstery fabric! It looks absolutely beautiful. You are my DIY hero 😀 We miss you guys terribly and are happy to see that you’re doing well!
Thanks Kendra! I am pretty happy with how it turned out! We sure miss you guys!
did you take off the wood when u stripped the fabric?
Hi There! Yes the wood pieces were screwed on so I took those off when I took the original fabric off and stained them, and then put them back on after the new fabric was on.
Omg I swear to jesus that I had a blue couch EXACTLY like that before I got rid of it…. crazy to see one just like it and the transformation! 🙂
Was the foam in good condition? I would hate to do all that work and the foam start falling apart! Did you add any fresh foam to the seat to build it up? Looks great! I have just received a sofa and chair from my grandmother who is now in a nursing home. Have loved them all my life, but a number of years ago she had them reupholstered in an awful fabric that doesn’t match our home at all. Maybe I’ll give it a try!
I lucked out that the foam was in really great shape, it have some dimples from the buttons but my Father in law told me that if you steam over the foam it will pull out all the wrinkles and dimples, it was a great trick and worked wonders!
You should definitely give it a try! It is a lot of fun ( with a little work mixed in) ;).
Thank you for encouraging others and the details. What a blessing 🙂
Wow. What a transformation! The one thing I don’t understand:
How to attach fabric where the arm meets seat base on the inside? Is it just tucked in deep? I don’t see how I could do anything else with arms that don’t come off easily.
I’m not sure the off-white would work well in my room, too light I think. But I love the drop-cloth idea…Has anyone dyed one in recent history? I know finding dye is something of the past. LIke a slightly darker beige color?
Thanks!
Reblogged this on Viri en Casa and commented:
Si estas cansado del tapiz de tus sillones, Esta es una muy buena idea para renovarlo.
Love this! You did a great job! I was directed to this post from pinterest and you gave me a great ideal. I have been looking for a table cloth for our huge pool table that has a ping ping table top. And when you mentioned you used the drop cloth to reupholster your couch,a light bulb went off and iI thought that drop cloth would be perfect for my table cloth. Thank you for making my light bulb turn on!!
This couch looks amazing! I love the fabric you used.
Awesome and inspirational. Thanks!
Great job! I am impressed! The color of the drop cloth makes it looks like such a classy sofa now!
Hi Alix, I have this same couch I’m trying to cover but am running into a few problems. How did you staple the new fabric on and how did you nail your buttons back in? There is no steady place to staple or nail, it seems to be all foam. Any suggestions?
Thanks!
I really love my sofa and you have the same sofa that my husband bought in the 90’s. Exactly the same!!! We live on one income and really can’t purchase a new sofa now. Reading your DIY has placed some really great ideas in recovering the sofa. Thank you for the wonderful instructions. I love to sew and quilt and this project seems to be the right way to go.
Excellent job!!
Bravo! It came out beautifully. I’m considering undertaking a similar task on a Victorian-era love seat. How long did the project take you from start to finish?
Alix. WOW!! Great job. You make it look easy. My old sofa is big as well and is similar to yours except it has a wooden “headboard” that goes across the top backrest. Seeing your post has made me want to try to redo my own as well. I believe the cover of mine has more sections than yours, as the back is a large piece by it’s self, but still doable. Thanks for sharing the important and helpful post with us.
You are a brave and talented woman … with a good husband, too. That’s a big help!!!
I am so impressed and inspired! ♡ Gonna try it! Wish me luck!
Love what you did with your sofa. I am curious — how is the fabric holding up? Would love to know if you would choose the drop cloth again if you had a choice. I am considering using it with my own sofa and don’t want to go to all the work if it is not holding up for you. Thanks for your thoughts!
Hey! The couch is holding up great, I have a thee year old and a 5 month old and it is doing really well with all the abuse. I put a zipper on the cushion cover which is must so I can wash it. If I were to do it again I would probably dye the fabric a darker color just because I have kids and the white is harder to keep clean, but as far as the durability of the fabric goes, I would definitely pick drop cloth again!
Pingback: DIY – Couch Reupholster | Crafting over Coffee
Good freakin job!!!!
I LOVE THIS! I am about to reupholster an antique couch i just scored off craigslist. i am like you, totally new at this but my wonderful hubby said a $15 couch is worth trying for. I was planning on using a staple gun as well and then gluing some rope/pipping on the edges of the couch to hide any staples that may show and just to jazz it up. My question is how did you do the cushion?? I’m not a sewer so I’m trying to figure out how to do it. Mine is the same shaped cushion as yours.
What I did was to completely take apart the old cushion cover, carefully paying attention to how it came apart, then I used the old fabric as pattern for the new one. I even reused the old zipper! It worked really well, the most important part is paying attention to how it was sewn originally.
Your project sounds like it will turn out awesome, I love the idea of the piping!!! Good luck!
Can you tell me the length of the couch?
Yes, it is about 7 ft long.